Blog

Get the latest from GetLunibox.com - your true source of everything related to Luniboxes

Why is Amazon selling fake Luniboxes?

When Urelas’ Luniboxes gained global recognition, counterfeit good makers from Amazon were one of the first ones to pick up on the trend.

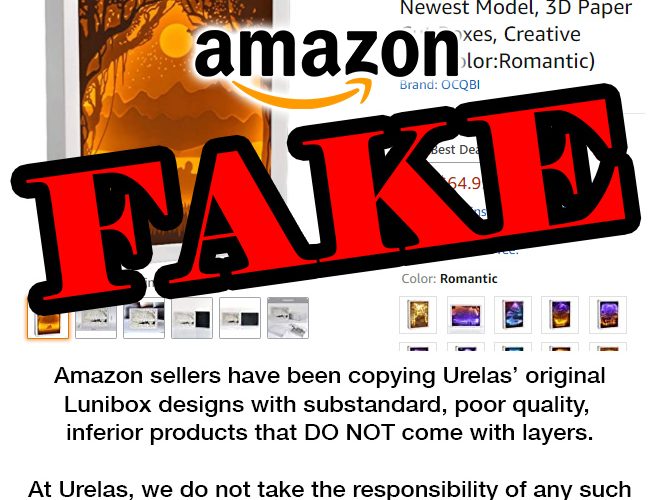
For those who don’t know, Lunibox is an artbox made of layering paper cuts and popularised globally by Urelas – a small family-run business in the heart of Idaho. That ships Luniboxes globally.

As soon as Urelas’ Luniboxes started gaining global popularity, Amazon sellers listed cheaply made replicas of Urelas’s Luniboxes on Amazon.com. This is where things get complicated.

The word Lunibox was applied for trademark by Urelas. Yet, despite multiple contestings with Amazon, Amazon decided to let their sellers use the word and list their products – given they add their own ‘uniqueness to the model’.

Thus, listings like ‘OCQBI Lunibox’, ‘Puzzle Lunibox’ started appearing on Amazon. According to Urelas, while the company indeed has a WIPO trademark applied for the term, Amazon wouldn’t pull down these counterfeit listings since the application is still in progress.

Granting trademarks can take years, and as long as Urelas’s trademark isn’t granted, Amazon can get away with selling such fake units on their platform.

So what’s the endgame here?

According to Urelas, you shouldn’t buy these fakes ever.

For the reasons being that, one, they are fakes. Other than that, these are mass-produced boxes that come from some unknown factory in China. Not only do they not pay any royalty to the original makers of these Luniboxes, but they’re never as accurate as shown in their pictures.

Urelas says that since Amazon isn’t honoring their code, they will not be selling their Luniboxes on Amazon. Thus, the original Luniboxes are only sold on Urelas’s official website.

Other than that, Urelas also gives a 30-day guarantee and 6-month warranty on all of their Luniboxes – something that no other counterfeit seller in the market would over do.

On top of that, Urelas’s official Luniboxes are much cheaper than their fakes sold on Amazon, and are shipped for free.

You can buy one of Urelas’s Luniboxes here.

How to make your own Lunibox in 6 steps – from the makers of Lunibox

We all know Luniboxes, they are sweet 3D art boxes that are made up by layering up paper cutouts one upon another.

You can either buy one of those that come pre-assembled from Urelas or create your own, today we’re gonna try and create one of our own Luniboxes.

Materials required:

  • Wood board 8 x 1 cm (2 x 27 cm; 2 x 20 cm)


  • Wood stripe 1 x 1 cm (2 x 25 cm; 2 x 18 cm)

  • Plywood 22 x 27 cm

  • White card stock (170 grams thickness)

  • Copy paper (80 grams thickness)

  • Foam core board

  • Glass panel 20 x 25 cm

  • RGB LED strip lights

  • White glue

  • Wood glue

  • Paint

  • Screws 4 x 16 mm

  • Pins
  • Step 1: Draw layers

    Start by drawing outlinings of your scenery on different papers. The trick here is to keep each forward layer smaller, or at least taking lesser canvas space, than its predecessor.

    Step 2: Cut it out

    Use an X-Acto knife to cut out each drawing that you’ve made. Keep your cutouts as precise as you can – which is the prime reason we’ve recommended getting an X-Acto knife as they’re designed for utmost precision.

    However, if you don’t have one, you can always use one of those stationary utility knives, the cutouts should turn out fine unless you’ve drawn something too complicated.

    Step 3: Resemble the layers

    Use thermocol (foam) pieces to form spaces between each layer. This is a crucial step as you don’t want too much of a space or the effect will be demolished. Keep them too close and lights won’t pass through.

    Ideally, we recommend keeping them 0.8-1.0 cms away from each other. Maintain consistency.

    Step 4: Create your wooden box

    You can buy these pre-made as well, or make up your own. Their size should encompass the layers you’ve made, along with the slabs causing spaces between each layer.

    You can choose to paint your wooden box (frame).

    Step 5: Make a back & light it up

    Use a white cardboard sheet or hard paper to create your back for the Lunibox. Lay down your RGB strip and create a small hole for the strip’s powering wire to go out.

    Use strong glue to stick your RGB with the back. For multiple colored – gradient effect – you can place one of your RGB strips on top of the back and another on the bottom.

    Step 6: Turn it on!

    And there you have it! A gorgeous art piece that you can finally gift to that displeased girlfriend of yours, she just won’t talk, eh? Try this.

Scroll to top

Order your Lunibox today ➡️

X